

Let's say your lawn fertilizer is meant to be spread at 20 lbs per 1,000 square feet or you need to add 3" of mulch to your beds how much should you buy? It's simple. Just point and click to find out the areas you're interested in to get square footage. It won't be exact but it'll be close enough for most uses.
Sketchup is a 3D modelling program that's very easy to use. Best of all it's free. There are two versions, the Pro requires a paid license but SketchUp Make has all the features you'll need for free.
In this post I'll go over how to quickly make a 2D diagram of your property to help you plan and manage your landscape. Best of all, you won't even need to step outside and take measurements.
What You'll Need
To get started you'll need the following:
- SketchUp Make
- A scanned copy of your property survey (gif, png, bmp, etc)
- Google Earth software (to help you measure items not on the survey)
Create Your Layers

SketchUp allows you to create layers to separate different parts of your drawing. You can turn visibility of layers on and off by clicking on the checkboxes and set the active layer by clicking on the round radio button.
In this example I created the following layers.
- SurveyImage (for the scanned property survey)
- Property Line (difines the property border)
- House (where you draw your house)
- Hardscape (driveways, walkways, patios, etc)
- Pool (water features or other accessories)
- Garden Beds (flower or vegetable beds)
- Lawn (your lawn area)
There is a default layer created with every drawing, Layer0. You can leave this as is. Just make sure as you're drawing different parts of your landscape you remember to switch the active layer.
Set Camera
SketchUp starts out with the camera in an orientation meant for 3D drawing. Since our plan will only be 2-dimensional we will make a couple of minor changes to the view to make it easier to work with.
First we'll change the projection. From the main menu select Camera -> Parallel Projection.
Next switch to an overhead view by going to Camera -> Standard Views -> Top.
Import Property Survey
Start by making the SurveyImage layer active and go to File -> Import to load your digitized property survey image into your drawing. Just place it anywhere on the drawing and scale it to any size. We'll bring it up to scale next.


Using the Move tool (M key), move a corner of your property onto the axis marked by the red and green lines.
Pick a horizontal or vertical line on your property survey to use as a reference line. In the example we're using the bottom property line which is 75.08' according to the survey.
Switch to the Property Line layer.
Use the line tool to draw a straight line in the same orientation as the reference line (horizontal or vertical) that is the same length as the reference line. Using the line tool (L key) click on the axis to start the line. Move your mouse in the direction you want the line to be drawn then type in the length of the line and hit enter. In our example it's 75.08'.
Now use the ruler tool (R key) to measure the actual length of the reference line on the property survey image. Divide the reference length (75.08) by the actual length of the reference line on the image to determine how much you need to scale the image. This is our scale factor.
Click on the property survey image and select the scale tool (S key). Click on one of the corners to scale the image evenly in all directions and then type in the scale factor to and hit the enter key.
Use the move tool again to reposition the property survey image on the edge of the line. You can use the rotate tool (Q key) to rotate the image if it's not perfectly aligned. Select the image, press Q for the rotate tool, click on the axis (start of the reference line) then click on the opposite end of the reference line and rotate the image so that it is inline with the reference line we drew.
If you don't have a property survey
If you don't have a property survey or you don't have it scanned you can use Google Earth to get measurements of your property. Find your home using Google Earth and use the measure tool to take measurements off the satellite image of your property. This won't give you exact measurements but it will give you a good idea of the size of different parts of your landscape.
Draw your property boundary
You should still have the Property Line layer active. Use the line tool to trace your property boundary by following the lines on your survey.
If you have any fences or gates within your property boundary draw those on this layer as well (or on a separate layer if you prefer.)
When you're done drawing the property boundaries the center will fill in with a solid color. We don't need this filled in area so just click on it and delete it by hitting your Delete key.
Select all the property lines and make them one group by going to Edit -> Make Group from the main menu. This will prevent some of the other features we'll be drawing from getting mixed up with the property line.

Draw your House
Before we can get to the landscape we'll need to draw some of the permanent features of the property, starting with your house.
Use the line tool and start tracing out the outline of your house. In the example I also traced around the step on the left and the concrete pad for the AC unit. These could also go into a different layer but I consider them more part of the house.

This time we're not going to delete the filled in area. Instead we're going to use the paint tool (P key) to fill the areas with different materials to better represent those areas. Select the appropriate materials from the Materials window and click on the areas to be filled. Shingles for the house, concrete for the pad and stairs, etc.
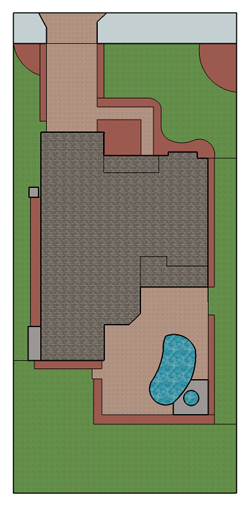
Your landscape drawing should be taking shape and look something like this.

Select all the lines and fills that make up your house and make them a group. (Edit -> Make Group)
Draw your Hardscape
Now make the Hardscape layer active and begin tracing out the areas that define your driveways, walkways, decks, patios and other hard surfaces on your property. Use a combination of tools such as the line (L key), rectangle (R key), circle (C key) and arc (A key) tools.
Create layers for other permanent features on your property that you want to include on your plan such as pools, ponds, sheds, detached garages, gazebos, etc. and trace them from the property survey.
Use the paint tool to give each area an appropriate material to make it easy to identify in your drawing.

Draw Your Garden Beds
We don't need the property survey image any more so feel free to click off the visibility of it to declutter the drawing.
At this point you're either going to want to draw your existing flower, shrub and vegetable beds or plan your new landscape beds. If you're drawing your existing landscape, take measurements of your beds or use the satellite image of your home and measure tool from Google Earth to get an estimated measurement.
Use the various drawing tools to define your beds and fill the areas with a material that makes them identifiable as beds. Various mulch and gravel options are available in the Ground Covers materials group. There is no soil material. When I want to use that I just use Asphalt as long as I'm not using Asphalt anywhere else.. It looks close enough.
If you want you can make your garden beds into one large group, individual groups or leave them as is. I like to leave them as is because it makes it easier to adjust both the beds and the lawn at the same time in the future.
The landscape plan is starting to take shape.

If you want you can make your garden beds into one large group, individual groups or leave them as is. I like to leave them as is because it makes it easier to adjust both the beds and the lawn at the same time in the future.
The landscape plan is starting to take shape.

Draw your Lawn Area
The final step to get a basic landscape plan is to draw the lawn areas. Make the Lawn layer active and use the various drawing tools to define where your lawn will be.
I like to break up the lawn into different sections based on how I tend to water or fertilize. For example the front lawn, side lawn, back lawn, and so on. You can do something similar if you like.
When you're done use one of the grass materials to fill in the lawn sections so they're easy to identify as lawn in your drawing.
Your finished plan now looks like this:

Using your Landscape Plan
Now with the basic plan complete we can use it to do some pretty neat things.
Measure Areas
SketchUp has a tool that will give you the surface area of a selected surface in the drawing. Let's saw we want to buy fertilizer for our lawn. We know that we need to apply 20lbs per 1,000 sq ft but how many square feet of lawn do we have?
It's now easy to find out. Right click over a lawn area and select Area -> Material from the popup menu and it will give you the square footage of all the lawn areas in the drawing. In this example that's about 4,800 square feet. To find out how much fertilizer we'll need it's just 4,800/1,000 * 20lbs = 96lbs of fertilizer.
You need to add more mulch to your beds? How much mulch should you order? Just right click on one of the beds, select Area -> Material and you'll get the square footage of all your mulched beds. If you want to add 3" of mulch multiply the square footage by the depth of mulch in inches and divide by 12 to get cubic feet. Divide again by 27 to get cubic yards. In our example there is about 1,250 sq ft of mulched beds. We'll need 1,250 * 3 / 12 / 27 equals about 12 cubic yards of mulch.
Plan your Plantings
You can also create layers and draw out where existing plants, trees, shrubs are located or where you'd like to plant them. Use the circle tool to define the spread of plants, make the circle a group and position and scale it where you'd like. You can get a little more creative with the shapes and colors to differentiate plants.
Plan your Irrigation
If you want to add sprinklers or drip lines just create a layer for them to draw their placement. Put each different type of piping on a different layer. Then when you want to know how much 1/2" drip line you'll need, select all the items in the layer and look at the Entity Info window and it will tell you the length of those lines.
Have any more ideas of what you can do with this plan or how you use SketchUp in your garden and landscape planning. Please share them in the comments below.
This is the first write up I've found of exactly what I want to do, thank you!!
ReplyDeleteBut I'm having a problem with the first image step. If I import the file, it is opaque. I can't move the property corner to the origin because the imported image blocks view of the axes as I move it. How do you make the image transparent enough to move its corner to the origin?
Press 'K' or go to View -> Edge Style to turn on Back edges and you should be able to see the axis through all objects.
DeleteIf you wanted to print this out and create a proposal what "affordable" software would you use? I'm in my second year of owning a Landscape business. I like to wow my potential clients with a basic 11x17 3 sided pamphlet. Front page overall site plan with keyed numbers or letters. Open up to square footage prices etc. Then in the opposite page a photo of the gravel or flowers etc. Page pages full breakdown of the bid. Thank you for your patience and your help.
ReplyDeleteDavid Baca
DirtCheapLandscapeNM