

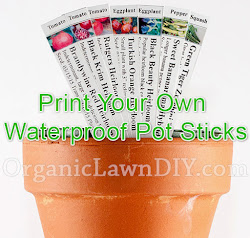
I've been looking for a good, affordable solution to print my own pot sticks at home for the vegetable plants I start from seeds. Partly because I like how neat good pot sticks look and partly because I'm going to be starting a few more plants than usual this year. (Okay, really it's because my handwriting on plastic pot sticks sucks.) After a bit of trial I've come up with a good solution that will allow me to print professional looking pot sticks with my laser printer.

The clear winner in my tests as far as durability, stiffness and appearance, TerraSlate 7 mil Waterproof Laser Printer Paper
 I can make the labels any size I'd like. The 5mil gloss paper has a slightly better looking appearance than 7 mill paper with the matte finish but they're both equally waterproof. The 5mil paper will blow around a little more in the wind but is stiff enough to use while plants are still indoors or in a sheltered greenhouse. It's still good for 1/2" to about 3/4" wide plant labels. Any thinner or wider you'll want the thickness of the 7 mil paper.
By laser printing the plant labels I'm able to fit a lot of information on each pot stick which helps me track the progress of each seedling better throughout it's life. I like having a picture on the pot stick but you can also save on paper by making thinner labels without pictures.
You can use a basic word processing application to make your labels (instructions at the end of the article) instead of some expensive custom software. I used OpenOffice.org which is a free/open source application suite.
You'll need a laser printer as the paper is not compatible with ink-jet printers. If you don't already own a laser printer you should. They're a little more expensive up front but you save a lot on ink. I've owned a color laser printer for about 7 years and I only changed the black toner cartridge once.
Print your labels to maximize the sheet. I'll provide some tips on doing that at the end.

Both sides of the paper are printable so you can include additional plant details or contact information on the back.

After you've printed your labels you need to cut each label out with a pair of sharp scissors or a paper trimmer. This takes some time but I still find it easier and faster than hand writing pot sticks.

You can insert the pot sticks between the soil and the side of the pot as is but I like to cut a point at the end of the pot stick. That way I can push the pot stick in the soil with ease. To cut the point start by folding the bottom of the pot stick in half lengthwise about 2".

Then snip off the end with a pair of scissors at an angle to create the point.


Now the pot stick will push easily into moist potting soil.

Pot Stick Label Templates
To create your label templates you can use Microsoft Office Word or OpenOffice.org Writer. Both have similar label creating functions and you can do a mail merge with both to populate the labels from a spreadsheet or database. I'm using Writer but the instructions are similar for Word.Start by going into File -> New -> Labels.
This brings up the label wizard. You'll need to fill in the appropriate label dimensions to create the labels.

Horizontal Pitch, Width and Columns
For our purposes horizontal pitch and width are the same. I like to print my labels out in landscape orientation with 2 columns of labels per sheet (so put 2 for columns) which is a nice size for my purposes.To calculate the horizontal pitch you need to know your printers minimum top and bottom margins.
Horizontal Pitch = (11" - top margin - bottom margin) / 2
The top and bottom minimum margins for my printer are 0.17" so for me my horizontal pitch is (11" - 0.17" - 0.17")/2 = 5.33"
Vertical Pitch, Height and Rows
In this application again, pitch and height will be the same. You need to determine ho w wide you want your pot sticks to be to come up with this measurement. Here's how I do it to maximize paper usage.First you need to calculate the maximum printable width for your paper based on the left and right minimum margins:
Maximum paper Printable Width = 8.5" - left margin - right margin
For me that comes out to 8.16"
Let's say I want to create 1/2" wide plant labels. I divide printable width by 1/2" and I get 16.32. That means I can fit 16.32 rows of labels on the page. What good is a 0.32nd of a label? None. I could just print the labels at 16 rows and throw away that extra third of an inch but why waste it.
I round 16.32 down to 16 and now divide my Printable width by that number to get my actual width of 0.51". That's a whole extra 0.01" on each label! Okay, it's not a lot but it beats throwing it away.
So my Vertical Pitch and Width will be 0.51"
Another way to do it is to just figure out how many labels you want. Let's say you're going to label a 36 cell insert and want to print a single page of labels for it. We'll have two columns of 18 labels each. or maximum printable width divided by 18 gives us the appropriate label width which in my case would be 0.45"
Rows will be the number of rows you decide you want to have and sheet.
Top and Left Margin
Enter the minimum top and left margin that your printer is capable of to maximize the sheet usage.Just click "New Document" and you're ready to start designing your pot sticks. Just remember to only print on the first 3" or so of the pot stick because the rest will go in the soil. Each label on the document will be in a frame. To make it easy to cut the pot sticks add a thin black border to each frame.
The TerraSlate Paper is waterproof and won't get soggy or disintegrate when exposed to water and each pot stick winds up costing me just pennies.

Hi - your waterproof plant tags are exactly what I want to be able to print on my new colour laser printer. I'm in England and seem to only be able to buy the TerraSlate papers from the USA so it's really expensive on postage and import duty! Does anyone know if the MemoryMap Toughprint and similar Xerox waterproof laser 'papers' (155gsm & 175gsm plastic sheet) work as well as the TerraSlate papers for outdoor plant tags?
ReplyDeleteThank you so much!
Ruth
Not familiar with the other papers. The TerraSlate has been working great for me.
DeleteWhat printer do you use?
DeleteI have an old Samsung color laser printer, CLP-300.
DeleteI also use open office. Do you have the file I could download?
ReplyDeleteIs it a special toner/ink to make it waterproof or just waterproof paper?
ReplyDeleteI just use regular toner.
DeleteDo you have a template?
ReplyDeleteThanks so much for posting this information.
ReplyDeleteI have been looking for a way to label my plants (no more than a few thousand per year) in a cost-efficient and attractive way for a long time. Handwriting is not a good solution! I will try out your recommendation. Thanks again!
This was extremely helpful! I built a template in excel and used a “corner eater” to round the corners. That paper is awesome!
ReplyDeleteHi,
ReplyDeleteI'm interested with this as I can print the photos of the flower. Will it fade away for outdoor plant?
Thanks
You are the coolest!!! Thanks for this article!! I HATE my handwritten plant tags. I usually can't fit the plant name and variety. I am planting enough seeds this year to sell some sprouts to my neighbors. Being able to fit care instructions, QR code, and a little picture will be AMAZING!!!!!
ReplyDeleteDoes the toner wash off or fade as it gets wet? like with daily watering? Thanks!!
ReplyDeleteWill this work with an inkjet printer?
ReplyDeleteI tried using 100# Rite in the Rain paper and they look great at first but deteriorate with the soil moisture. They did not work for more than a couple of weeks and then had to be discarded.
ReplyDeleteBrand, model number of printer please. Spend too much on ink !!!
ReplyDelete